Categories
Design Open Source Quick Tips Resources

Subtle Patterns Plugin – Free

pattern-blog-image
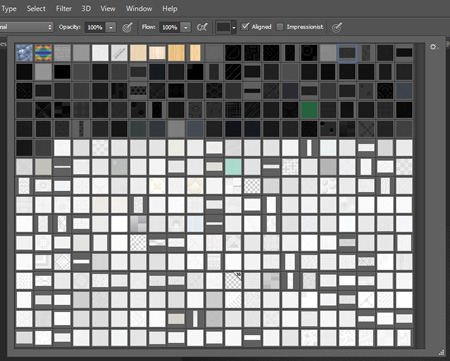
Look at all of those patterns!


update: The link in my article still works. Subtle Patterns has changed it’s format to a paid plugin, individual patterns are still available. Due to the pay to play nature of the photoshop plugin, they’ve removed links to the collection download. 

I wanted to share a resource I’m completely infatuated with: Subtle Patterns. This website aggregates free to use subtle patterns, and shares user contributions to the rest of the community.

The best part of this website? They don’t make you jump through hoops to get their files! No sign-up, emails, or other crap no one really wants to deal with (why do you think my comments are registration free?). Even better, they have every pattern available for free, in a master pattern file. The default photoshop patterns suck (pardon me), and loading up this free subtle patterns download  really gives you a great choice of patterns to integrate into your design work.

I had a user email me with some questions on installing subtle patterns into Photoshop. It’s really simple, just follow these steps:

  1. Follow the link above and download the subtle-patterns SubtlePatterns.pat.zip file
  2. Open the archive (zip) and extract (drag/drop) the SubtlePatterns.pat file into your file system
    • Note: C:\Program Files\Adobe\Adobe Photoshop CSX\Presets\Patterns is ideal
  3. Open Photoshop and click ‘S’ to open your stamp tool
  4. Switch to the pattern stamp tool if Clone Stamp is active by holding your mouse button down on the Stamp tool icon
  5. Activate the pattern dropdown in the top ribbon, usually below the help menu
  6. In the top right corner of the window, there is a gear icon – clicky clicky
  7. Pressing load patterns will open one final dialog
  8. Locate your pattern files and load them through this dialog
  9. Enjoy the Subtle Patterns Plugin – Free Download

Backup Link In case the github link goes down.

Categories
Connectivity Video

This About Sums up Data Providers Today

Categories
Design Video

Amazing designs with household objects. [VIDEO]

Via: http://www.wimp.com/householddesign/

I just wanted to share this video with you guys. Design has so many mediums and this guy illustrated wonderfully how simple things can come together with the right type of planning. Note the type part, bad planning isn’t going to get you good results all too often. Cheers!

Categories
Apple Hacking iPhone Jailbreaking Software Tutorials

Untethered Jailbreak with “evasi0n – iOS 6.0-6.1.2 Jailbreak” on a Windows PC

Jailbreaking iPhones is nothing new, nearly any and all handheld apple devices have had a crack of some sort available since  2007. Software based cracks started popping up in 2008, with a lot of the early work being done by George Hotz.

The actual jailbreak process is extremely straightforward. Only a few steps are required…

We’ve come a long way since the early days, with the ability to jailbreak in under five minutes, as well as with a one click solution through your iOS device’s browser. Despite the ease of use, the more recent iterations of the iPhone have closed the security breach that allowed for websites like www.jailbreakme.com to work. For that reason, I’ll be using the evasi0n – iOS 6.0-6.1.2 Jailbreak to free an iPhone 4 16gb running OS 6.0.1 baseband 01.59.00*. The phone is carrier locked and the owner will be leaving for Europe shortly, and they need an internationally functioning phone.

download_evasi0n_jailbreak

Preparing to Jailbreak

There are a few requirements before you can begin unlocking an iOS device with the Evasion Jailbreak.

  1. You need a suitable machine to perform the jailbreak with, supported operating systems include: Windows, Linux, and Mac OS.
  2. iTunes needs to be installed on your computer of choice.
  3. Your iOS device needs to be updated to at least iOS 6.0
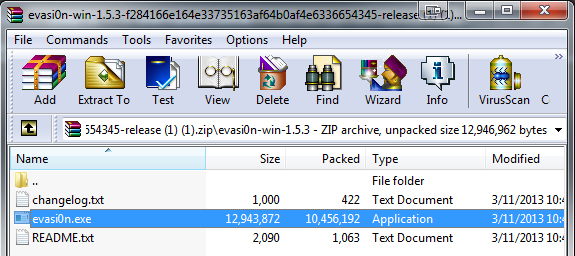
  4. You need to have downloaded the Jailbreak executable, available here.
  5. An extraction tool to get the files from the download, I suggest WinRAR by RARLAB.
  6. You should back up any device before you jailbreak, should something go wrong.

Jailbreaking Process

The actual jailbreak process is extremely straightforward. Only a few steps are required to successfully jailbreak you iOS device using the evasi0n jailbreak.

Requirements

Ensure you meet all of the requirements listed above. Install iTunes, backup your iOS device (iPhone 4 in this case), and download the jailbreak tool.

Extract

Extract the executable file to your desktop (or wherever is convenient) for later use.
Extract the executable file by dragging and dropping onto your desktop (or wherever is convenient) for later use.

Connect

Connect your iPhone or other Apple iOS device to your computer via usb/proprietary connector. Ensure your computer recognizes that your device is plugged in.

Run

jailbreaking-process-zachary-melo

From this point forward, we will not be touching iTunes or the iPhone until explicitly told to do so. Double click on the evasi0n icon that you’ve extracted and allow the program to run (if a dialog box appears). You will see the image above (less the bits about being jailbroken already), and if you read carefully – you’ll see that evasi0n is already scanning your phone’s software to see if it’s compatible. If everything is good, you can proceed with the one-click install of the jailbreak. Simply click on the button to the right and let the program do it’s thing.

In about five minutes you will be prompted to unlock and press a new icon on your apple device. After doing so, the device will power cycle several times. At this time, you can boot up Cydia App manager, which will again reboot your system. Cydia allows you to install third party applications on your Apple device, you are now free to download unapproved apps and tweaks not officially approved by Apple. This includes the tool we’ll be using to break our carrier sim-lock.

Carrier Sim Unlocking

UltraSn0w

Open Cydia and tap on the Search icon, and search for UltraSn0w – download and install this package. From here we will need to add an additional repository to our Cydia application. To do this we:

  1. Open Cydia’s home page by closing and opening the app
  2. Tap on the Manage icon found in the bottom bar
  3. Tap on the Sources button in the middle of the screen
  4. Tap on the Edit button found in the top right hand corner of your screen
  5. Click on the Add button that appears in the top left of the screen
  6. Type into the text box, http://repo.iparelhos.com”
  7. Tap the Add Source button
  8. Once the operation completes, tap the Return to Cydia button found at the bottom of your screen (you may have to scroll)

Go back to your Cydia home screen and pull up the search function again by tapping the Search icon found in the bottom right corner of the screen. Search for Ultrasn0w Fixer for your OS version, and install this application. In my case, I’ll be using the Ultrasnow Fixer for 6.0.1.

That’s all, you should be unlocked and ready to go. If this doesn’t work, chances are your baseband version is too recent. If that’s the case, you’ll have to visit http://www.unlockboot.com/2012/10/jailbreak-ios-6-iphone-4-iphone-3gs.html for a tutorial on how to use RedSn0w.

Categories
Open Source Quick Tips Software Tutorials

Following RSS Feeds with Mozilla Thunderbird

So I know many people see the RSS feed logo on a daily basis and have no idea what it does, or why it exists. RSS stands for rich site summary,  and does exactly what the name implies – provides a detailed summary of what is happening with a blog, news feed, or website in general. Most people use RSS because it can streamline a user’s daily news. Instead of visiting all of the blogs I enjoy to check for new content, or signing up for newsletters, I can have news and posts piped right into my RSS client. In this case I’ll be using Mozilla’s discontinued Thunderbird mail and feed client. I love the program as a free offline mail program, for it’s scheduling ability, and feed following, did I mention it was free? Get it here.

This is an RSS icon, you've undoubtedly seen it before.

This is an RSS icon, you’ve undoubtedly seen it before.

  1. Start by launching Mozilla Thunderbird
  2. Press alt to bring up your menu bar
  3. Navigate to File > New > Other Accounts…
  4. Select ‘Blog & News Feeds”
  5. Next
  6. Name your feed, I choose names based on how it will help me sort the feeds
  7. Next and finish
  8. In your left bar you should now see your new account, click on it
  9. Center top of your screen, click on “manage subscriptions”
  10. Paste or type in your feed URL
  11. Finish by clicking add
  12. Browse your new feed by clicking on it’s name in the left panel
  13. Double click a post title in the center window to open it in Mozilla Thunderbird
Categories
Open Source Quick Tips Software

A Tool for Remapping Your Keyboard

I needed to rename hundreds of files individually, with underscores instead of spaces. I could have named all of my files using spaces, and used str_replace among other PHP tricks to change them to underscores. Instead I turned to the powers that be (read: Google) and discovered a handy tool, AutoHotkey. This tool allows you to do anything from re-mapping a key, to completely automating tasks via it’s native scripting language and macros.

51374bc4d535cf19f9000084

Direct from the AutoHotkey website:

AutoHotkey is a free, open-source utility for Windows. With it, you can:

  • Automate almost anything by sending keystrokes and mouse clicks. You can write a mouse or keyboard macro by hand or use the macro recorder.
  • Create hotkeys for keyboard, joystick, and mouse. Virtually any key, button, or combination can become a hotkey.
  • Expand abbreviations as you type them. For example, typing “btw” can automatically produce “by the way”.
  • Create custom data-entry forms, user interfaces, and menu bars. See GUI for details.
  • Remap keys and buttons on your keyboard, joystick, and mouse.
  • Respond to signals from hand-held remote controls via the WinLIRC client script.
  • Run existing AutoIt v2 scripts and enhance them with new capabilities.
  • Convert any script into an EXE file that can be run on computers that don’t have AutoHotkey installed.

This thing already saved me two hours of shift clicking by allowing me to remap my underscore to the spacebar. Totally a five-star piece of software and my open source recommendation of the month.

Categories
Javascript jQuery PHP Tutorials

Customizing Supersize JQuery

I was recently hired to create a slideshow for a customer’s display at trade shows. For me, the solution was simple… we kill the Batman. All joking aside, I knew exactly what I was going to do from the outset of this project.

The previous revision of this client’s presentation was a combination of circa 2008 hacks and flash. This combo together yielded a surprisingly well working slideshow with menus to select and sort shows. None of this content was dynamic in any way. With relatively short notice, there was no way I was to even salvage any part of the relic that was their past show.

I opted to use Supersized, an awesome jQuery plugin by Sam Dunn of One Mighty Roar.

supersized-screen

The unfortunate thing about Supersized is it’s method of serving images. It’s engineered to be user friendly and be easy to use for even the most inexperienced code monkey. In the packages latest release, Sam has included some demos that can safely be used as starting points. This is exactly what I did, cutting what I can only imagine to be more than a week of work out of the project. This gives me more time to focus on the fine details and saves my customer money all the while – we both win.

When you download the supersized.x.x.x.zip file and open it up, you will see this:

supersized-tree

Thank goodness for logical naming conventions, this folder is pretty self explanatory. Core holds the most stripped down version of the Supersized slider, while Flickr offers a slider that will pull content from a Flickr feed, and slideshow is the folder we’re after. As a side note: please take time to read and follow the directions as well as licence agreements included with any plugins or work that aren’t completely yours.

The Code – Default Behaviour

The first chunk of code we’re looking for can be found in demo.html

slides : [ // Slideshow Images
{image : 'http://buildinternet.s3.amazonaws.com/projects/supersized/3.2/slides/kazvan-1.jpg', title : 'Image Credit: Maria Kazvan', thumb : 'http://buildinternet.s3.amazonaws.com/projects/supersized/3.2/thumbs/kazvan-1.jpg', url : 'http://www.nonsensesociety.com/2011/04/maria-kazvan/'},
{image : 'http://buildinternet.s3.amazonaws.com/projects/supersized/3.2/slides/kazvan-2.jpg', title : 'Image Credit: Maria Kazvan', thumb : 'http://buildinternet.s3.amazonaws.com/projects/supersized/3.2/thumbs/kazvan-2.jpg', url : 'http://www.nonsensesociety.com/2011/04/maria-kazvan/'},
{image : 'http://buildinternet.s3.amazonaws.com/projects/supersized/3.2/slides/kazvan-3.jpg', title : 'Image Credit: Maria Kazvan', thumb : 'http://buildinternet.s3.amazonaws.com/projects/supersized/3.2/thumbs/kazvan-3.jpg', url : 'http://www.nonsensesociety.com/2011/04/maria-kazvan/'},
{image : 'http://buildinternet.s3.amazonaws.com/projects/supersized/3.2/slides/wojno-1.jpg', title : 'Image Credit: Colin Wojno', thumb : 'http://buildinternet.s3.amazonaws.com/projects/supersized/3.2/thumbs/wojno-1.jpg', url : 'http://www.nonsensesociety.com/2011/03/colin/'},
{image : 'http://buildinternet.s3.amazonaws.com/projects/supersized/3.2/slides/wojno-2.jpg', title : 'Image Credit: Colin Wojno', thumb : 'http://buildinternet.s3.amazonaws.com/projects/supersized/3.2/thumbs/wojno-2.jpg', url : 'http://www.nonsensesociety.com/2011/03/colin/'},
{image : 'http://buildinternet.s3.amazonaws.com/projects/supersized/3.2/slides/wojno-3.jpg', title : 'Image Credit: Colin Wojno', thumb : 'http://buildinternet.s3.amazonaws.com/projects/supersized/3.2/thumbs/wojno-3.jpg', url : 'http://www.nonsensesociety.com/2011/03/colin/'},
{image : 'http://buildinternet.s3.amazonaws.com/projects/supersized/3.2/slides/shaden-1.jpg', title : 'Image Credit: Brooke Shaden', thumb : 'http://buildinternet.s3.amazonaws.com/projects/supersized/3.2/thumbs/shaden-1.jpg', url : 'http://www.nonsensesociety.com/2011/06/brooke-shaden/'},
{image : 'http://buildinternet.s3.amazonaws.com/projects/supersized/3.2/slides/shaden-2.jpg', title : 'Image Credit: Brooke Shaden', thumb : 'http://buildinternet.s3.amazonaws.com/projects/supersized/3.2/thumbs/shaden-2.jpg', url : 'http://www.nonsensesociety.com/2011/06/brooke-shaden/'},
{image : 'http://buildinternet.s3.amazonaws.com/projects/supersized/3.2/slides/shaden-3.jpg', title : 'Image Credit: Brooke Shaden', thumb : 'http://buildinternet.s3.amazonaws.com/projects/supersized/3.2/thumbs/shaden-3.jpg', url : 'http://www.nonsensesociety.com/2011/06/brooke-shaden/'}
]

This is where the average user would manually enter all of the file names, locations and properties for each slide. We’re going to modify this chunk of code to scan a directory for images, and then output the images into this list. To do that we will have to use PHP. If you don’t have a server to test and develop on (I don’t blame anyone), you have no excuse to not be using XAMPP. XAMPP will emulate a server environment (sort of) on your own local machine, allowing you to work with PHP and databases. I choose to use XAMPP for this project for several reasons.

  1. Connectivity at trade shows is an unknown factor. 
  2. Serving large high-resolution photos remotely is slow and gobbles bandwidth.
  3. By keeping files totally local, there is little to no need to account for security in PHP used.

The Code – Dynamic Behavior

Our PHP will look like this, explanation as we continue.

slides  :[]

Line 1 shows that we are opening a section of php code within our page – <?php to open, ?> to close.

Lines 2, and 3 we are establishing our variables. We set where we can find the images to be used in our slideshow, and where their thumbnail images are.

Line 4 runs a command that will scour our directory that we set, looking for all files (the asterisk *) with a ‘.jpg’ at the end. Whatever files are found, are then saved to an array as the variable $images. Line 5 runs the same command for the thumbs folder.

Line 6 is where the magic starts to happen, both arrays – one for whole images, the second for the thumbnails – are combined into one array. It’s important to note that the number of files in both folders (arrays) need to be identical, otherwise the arrays cannot be combined.

Line 7 begins a foreach loop that goes through the array and for every item, gets the combined contents in order and echos them as lines that mimic our starting JavaScript.

There you have it, dynamically loading content for your slideshow.

Polishing and Future Posts

One note to make is that the naming of each file will simply be the file name as it is on your server. You can correct this with PHP’s trim and str_replace.

slides  :
[]

These new lines must go inside of the for each loop so that the variable is refreshed with every pass of the array. Trim does exactly what it sounds like, trims what you give it. In this case it’s removing the directory path from the name of the file, and then the .jpg at the end of the name. Str_replace is capable of replacing a string of characters with another string (or nothing at all). In our case, I’m converting the underscores in file names to spaces. With these changes, the file “images/A_burning_page.jpg” will now be titled “A burning page.”

This article will be referenced in the near future when I get into explaining generating a full gallery/list of slideshows based on folders of images. Follow my RSS and comment for further help.