If you’re running Dolibarr v22 and your Multi-Currency Module suddenly stopped syncing exchange rates — throwing an invalid_access_key error from CurrencyLayer — you’re not alone. The fix takes about 30 seconds.
The Problem
CurrencyLayer migrated their API infrastructure to a new domain under APILayer, but Dolibarr v22’s default endpoint URL still points to the old one. The result: your API key is perfectly valid, but the legacy endpoint no longer recognizes it.
Here’s the error you’ll see when testing the connection or when your scheduled CRON job tries to sync rates:
{
  "success": false,
  "error": {
    "code": 101,
    "type": "invalid_access_key",
    "info": "You have not supplied a valid API Access Key. [Technical Support: support@apilayer.com]"
  }
}
This is misleading — your key isn’t actually invalid. It just needs to be sent to the right place.
The Fix
Navigate to Setup → Modules/Applications → Multi-Currency, or go directly to:
/admin/multicurrency.php
Find the API endpoint URL field. It will contain the old default:
The domain moved from api.currencylayer.com to api.apilayer.com/currency_data
The source parameter was renamed to base, and the access_key parameter is no longer passed in the URL (it’s handled differently by the new endpoint)
Hit save, then use the manual sync button to confirm rates pull correctly before relying on your CRON job again.
Will This Be Fixed in Future Versions?
I believe this will be addressed in Dolibarr v23, but if you’re running v22.0.x and don’t plan to upgrade immediately, this manual endpoint change gets you back up and running right away.
I originally posted this fix on the Dolibarr international forum — check the thread there for any additional community discussion or updates.
Quick Checklist
Go to /admin/multicurrency.php
Update the API endpoint URL to the new api.apilayer.com domain
Test with the manual sync button
Confirm your CRON job runs clean on the next scheduled cycle
That’s it. Thirty seconds and your multi-currency rates are flowing again.
Sometimes a tinkerer needs to accomplish something that literature says requires special lab equipment…
There is very little information online about correcting silicon carbide (SiC) discolouration outside of an industrial laboratory. After some experimentation in our glass studio, we successfully cleared the yellow tint from SiC using a modified atmospheric annealing process. Here is how we did it:
The Problem: Lattice Defects from Overheating during Polishing Turn White Moissanite Yellow
Yellowing in SiC is typically caused when clear or ‘white’ Moissanite gets too warm during faceting or polishing. I believe this was a 6H or 4H stone. To clear these, the material must be heated to a range where the atoms can “reset,” but doing this in open air causes the surface to oxidize and char.
The Custom Setup
We bypassed the need for an industrial vacuum furnace by repurposing high-heat glassblowing tools and cannabis paraphrenalia to create a controlled inert environment:
The Chamber: A high-purity quartz banger. Quartz was chosen for its ability to withstand extreme temperatures without cracking or reacting.
The Atmosphere: We flowed high-purity Argon through a flow meter into the bottom neck of the banger. We kept the flow very low—just enough to maintain a positive-pressure “blanket” that displaced all oxygen.
The Heat: An oxygen/propane glassblowing torch.
The Process
We took multiple tries at heating and cooling the stone. Three times of raising to glowing hot, briefly holding, and then cooling. There’s no way for us to know that those three heats were as good as one big heat – but this is simply what happened and worked in our little setup.
Slow Warm-up: We brought the temperature up gradually to avoid thermal shock.
Visual Heat Management: While we used a thermal camera and a thermocouple to monitor the start, our equipment maxed out at 1000°F. We pushed significantly hotter, using the bright incandescent glow of the crystal as our indicator that we had reached annealing temperatures.
The Reducing Flame: To cool the piece, we used a large, bushy reducing flame. This provided a gentle thermal taper while adding an extra layer of protection against oxidation.
Cycling: We repeated this heat-and-cool cycle three times.
The Result
By the end of the third cycle, the yellowing had completely dissipated. By maintaining a strict Argon environment and controlling the descent with a reducing flame, we achieved laboratory-grade clarity using studio equipment.
With precise atmospheric control and a good “feel” for heat, the yellowing of SiC can be fixed without industrial-scale machinery.
Problem: Puffco Peak Does Not Charge via Micro USB Port
Our Puffco came to us defective, from a friend: it wouldn’t charge. My first task was a disassembly, which you can read about here. I determined the charging circuit in my puffco was defective, and set out to solve the problem.
I reached out on Reddit after my teardown video to see if anyone had more information. Reddit user MAXVapor710 posted this:
… The other possible scenario is a bad charge controller, which requires surface mount rework on a very small component. The Charge Controller is a Monolithic Power Systems MP2615 https://www.monolithicpower.com/en/mp2615.html
These usually get very hot when they are not working correctly, easily diagnosed with a thermal cam or a sensitive finger.
We do repair out of warranty Peaks, and offer a battery replacement service, if you have any more questions let me know or email support@maxvapor.com
With that information, I knew I didn’t have the right tools to do a surface mount rework of the chip.
I opted for bypassing the internal charger altogether in favour of an external third party charger. There are a few choices here, and this is one of those times where you get what you pay for.
I learned from MaxVapor that this evaluation board is the correct replacement for this hack. It uses the MP2615 and has large pads to solder to, and charges the Puffco battery the exact same way that the factory circuit that has died used to.
Option 1 (Good) – DC Wall Wart aka Dumb Charger
Do you have a bin of abandoned wall adapters in a closet somewhere? Perhaps under the stairs or in the garage? Go find it and look for an AC to DC converter rated at 7.5 volts and 1 amp. Slightly higher voltage and amperage may work, but I wanted to err on the side of caution.
One of these multi-voltage adapters should work, but again mind the specs – I don’t know what might happen if the rated amperage is too high.
Multi-volt AC-DC adapter from Amazon for around $15
If either the voltage or amperage is too high, you can damage your device and the batteries – potentially leading to a fire and a new paperweight instead of a fixed Peak. Please be careful, and only proceed if you are confident in your decision.
I only suggest this solution if for some reason you already have a AC-DC adapter of the correct specifications, or cannot acquire a smart charger.
Option 2 (Better)- Smart Charger
With a smart charger, the risk of overcharging or damaging your batteries goes down a lot. These chargers measure the voltage of the battery, adjusting the amount of energy delivered to both maximize the lifetime of the battery and the safety when doing so.
A bit fancier than the other smart charger, this will tell you more about your battery.
I use a fancy charger like the one above, but this one from Amazon should work too. You will need to make an adapter to go from the charger to the barrel connector if the charger doesn’t come with one.
This is different for every charger and whichever connector you choose to add.
A representative of Max vapor is the user who reached out on Reddit with the information about which component failed. I have no other affiliation, or business experience with them – but I recommend MaxVapor based on my limited interactions so far.
The 3D Model
3D Model I created to house the DC power jack
Based on measurements I made, this model was designed over the course of a few days. It can still be improved upon, and I will happily share my working files with anyone who requests. Grab the 3D print files from Thingiverse:
The thingiverse page has two .stl files, the second file being the bottom cap for the base.
There are a few areas that require support for printing, but your printer will be different than mine – so adjust accordingly. I printed using PLA and have not had any issues with my base in the months I’ve used it.
The screw posts in the model ended up weak in my print, and eventually snapped off. This wasn’t an issue, as the tight fit of the base cover plate allows it to snap in place easily.
The Hack
Step 1: Disassembly
You will probably want to watch my first video on how to get into the Puffco body.
Step 2: Add Wires to the Positive & Negative Pads of the Main Board
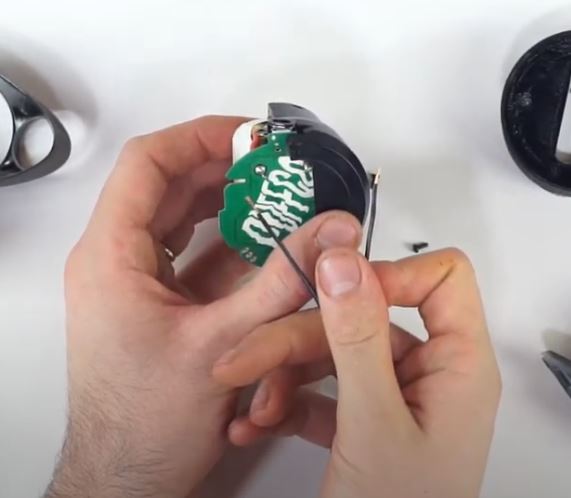
Once inside your Puffco vape, it’s a simple process of adding a positive and negative wire onto the pads found on the main board. This is done using solder and a soldering iron to make a strong electrical connection.
The red wire, coming from the battery is positive (+) and the black wire is negative (-). It’s important that you lay the wires flat against the circuit board to solder them, otherwise they will be in the way when you attempt to close the case back up.
The positive lead is pictured above, on the left by the second F & C of Puffco The negative lead is not visible in this photo
Step 3: Reassemble your Peak with Wires Sticking out the Bottom
With the wires attached to the main board, you can close the plastic back up and route the wires down through the rectangular opening that remains. Do not reinstall the fancy metal plate on the bottom of your Puffco. Store it in a safe place, you don’t need it if you’re using my .stl files for the 3D printed base.
Step 4: Attach the 3D Printed Base Using Double Sided Tape
Using some double sided foam sticky tape, you can affix the 3D printed base to the Puffco and feed the wires into the housing.
Make sure you use double sided tape that has a nice puffy foam core. My .stl files are not tight enough tolerance to get a great stick with thin double sided tape.
With the new base attached, and wires sticking out.
Use heat shrink around any soldered connections to prevent dangerous short-circuit conditions.
Step 6: Test Your Fixed Puffco Peak
With the DC jack connected and installed, you can test your work to see if your battery still charges. I tested mine by soldering the pack directly to the board, and plugging it in to charge – only proceeding once I verified the fix would work.
This faulty Puffco Peak vaporizer came into my possession within the last few weeks, via a friend of mine. I was told, “It doesn’t charge – it’s broken.”
These devices are simple, and with that in mind; there shouldn’t be too many ways for the device to fail. I just needed to get inside and start probing around with my multimeter.
The teardown video is up on Youtube now:
Step by Step Instructions: How to Open a Puffco Peak
Let’s assume you don’t need a hand in figuring out how to remove the glass from your puffco. We’re starting off with a standard Puffco Peak base – glass removed.
Step 1: Remove the Atomizer & Surrounding Components
Begin the disassembly process by removing the atomizer, bucket, and surrounding components. This can be removed as one whole piece, or disassembled and removed piece by piece. If you have done this before it makes sense, otherwise: read on.
The first piece to be removed is a silicone and ceramic ring. It will lift off, and may require a twisting motion or a small amount of heat if it feels stuck.
Next is the bucket. It should lift right out. If it feels stuck, apply a small amount of heat and try again. Do not force this out. The bucket rests directly atop the heating element – extract can glue it in place – and tugging on the element can damage it’s fragile connecting wires.
Unscrew the metal housing for the heater by turning it counter clockwise several times to disengage the threads. Lift the entire component out of the silicone well.
Step 2: Pry the Shiny Metal Piece Upwards
Place your fingers above the USB port where the shiny material and silicone meet and pry upwards on the shiny metal/plastic piece that surrounds the Puffco Peak. This piece is glued in place, and requires a small amount of force to lift. Be careful and go slow. You may use a guitar pick or some other soft plastic prying tool to start the job if your fingers can’t get in there.
Step 3: Remove the Silicone Boot
Using your thumbs, press outwards from the center on the base of the Puffco Peak. The silicone will lift out from under the shiny metal base of the Puffco. Work your way around, breaking the seal and releasing the silicone from the bottom of the Puffco. Once the silicone boot is loose the the bottom, pry upwards from below the USB port and remove the silicone sort of like a sock, where the atomizer connection is the toe.
This is the most confusing part of this disassembly, and I suggest you watch the video starting from about the 1:00 minute mark for a video example.
Step 4: Pry the Metal Base Off
Note: In my video, I perform step 5 before step 4 – and it really doesn’t matter in the end, but I feel it’s easier in this order.
Use your fingers or a pry tool to peel the metal disc off of the bottom of the plastic Puffco Peak base. It may help to warm this area with a hair dryer or gently using a heat gun. The adhesive is fairly strong, and so some force is required to remove this piece.
Step 5: Unscrew 3 Security Screws
Use a screwdriver set like this one from Amazon to remove the three screws holding the plastic assembly together. One of these screws is below a security sticker, revealing silver ‘VOID’ markings when removed. Remove all three screws, and your Puffco will almost fall apart in your hands.
Step 6: Open and Inspect
That’s it, your Puffco Peak is open before you. In my case – I did some poking around with a multimeter and determined that my battery was not putting out a high enough voltage. I still have some detective work to do to determine why my Puffco Peak doesn’t charge.
What’s Wrong with My Puffco Peak?
The Puffco lights up, and indicates it’s taking a charge when plugged in to USB. When removed however, the battery is completely dead and the Puffco shows no signs of life. Checking the voltage supplied to the battery while plugged into USB showed only 4.5v – too low to charge a 7.4v battery pack – unless there were a buck converter somewhere on the battery pack I have yet to find.
I suspect that there is an onboard boost converter that steps USB voltage up to above 7v, and it is defective. I assume that this is the case, because when I apply 7.5v to the battery connection leads – the battery charges and holds its charge. It’s only on USB power that the device fails to charge.
Next steps are to poke around a bit more, and see if rescuing this battery back above it’s rated voltage is enough to keep it working. If that isn’t the case, I’ll be adding an external battery pack to make up for the lack of internal charge circuit.
Ideally, finding out which component has failed; and swapping it for a working one is best – but my electronics skills are limited. If anyone has input, questions or ideas – I would love to hear them in the comments below or on the Youtube video linked above.
After contacting the developer of the plugin, the whitespace issue must have occurred during file transfer or during some other mysterious occurrence. The whitespace is not in the original development code, and so not only are my line numbers all wrong, but this shouldn’t be an issue for anyone else.
While working with the plugin My Calendar by Joe Dolson I encountered a small issue. Whenever I tried to view my calendar as a list, the event list would become hidden on page load.
I had to identify the offending script that was hiding my events on me. Using Chrome’s debugger I was able to identify the offending script as “../wp-content/plugins/my-calendar/js/mc-list.js” which included:
Which directs all children that aren’t the date to be hidden. The issue arises when WPautoP does it’s thing and wraps the date in a <p> paragraph tag. While the .event-date will remain visible, it’s parent <p> becomes hidden and in turn hides .event-date.
The solution is to modify “../wp-content/plugins/my-calendar/my-calendar-output.php” at line 2563 to remove the unnecessary line breaks.
I’m going to get in contact with the dev as this is the second time I’ve run into issues because of whitespace in the source code.
This is an off-beat post, and has nothing to do with websites or the digital world for that matter. I’ll be going through the steps I used to fix a broken pocket scale that was gifted to me – I get a lot of, “If you can fix, it it’s yours” gifts.
This 50.00g digital scale stopped working for an unknown reason, and the top suggestion for fixing these scales is a re-calibration. Unfortunately, this digital scale could not be calibrated – likely a result of the problems it was already having. After further inspection I realized the scale still accurately measured negative values. At this point the, “if it’s broken and destined for the garbage, I had might as well see how it works.” Was running through the back of my head.
Check the video out for a quick little tutorial and walkthrough of how I got my scale back in mostly working order. Step-by-step below.
Remove the top plate of your scale to gain access to the mounting points of the weight surface.
In my case there were two Phillips screws
Flip the scale and remove the battery cover to reveal the second mount point
Remove that pair of screws and set them aside as well
Under where the weigh platform was, flip the sensor bar
Re-attach all components
The kicker is, now when I lift the weighing platform, it shows me a proper positive number – reversing the fix brings the problems back. Does anyone with more knowledge of digital circuitry have an explanation for this rogue resistor?
UPDATE: Unfortunately, this doesn’t quite work anymore.
So you’re sick and tired of Youtube’s popup asking, “Do you want to use your real name with your Youtube channel?” No? How about the part where when you check ‘no’ and are greeted with, “Okay, we’ll ask you again later.”
Here’s my quick tip to keeping your Google account separate from your otherwise anonymous Youtube account.
For this you will need a modern browser like Chrome, Firefox, Safari, etc. (which you should have anyways… please?) and the Ad-Block Plus Extension. It’s simple as far as implementation and will only take a minute after you’ve installed the extension.
How To
Going into your Ad Block Plus settings by right clicking on icon will open a dialog.
Go to the custom filter list in the options panel and select, “Manually edit filters” and add the line: ||s.ytimg.com/yts/jsbin/www-linkgplusdialog*
Click for a larger view.
Don’t forget to add the “||” as they act as a catch all for http://, https://, and www prefix, which saves you from making three or four rules for one blocking.
Bonus: Block Video Annotations
||youtube.com/annotations_invideo*
Adding the line above to your custom filters will hide annotations in all Youtube videos, even while logged out.
Jailbreaking iPhones is nothing new, nearly any and all handheld apple devices have had a crack of some sort available since 2007. Software based cracks started popping up in 2008, with a lot of the early work being done by George Hotz.
The actual jailbreak process is extremely straightforward. Only a few steps are required…
We’ve come a long way since the early days, with the ability to jailbreak in under five minutes, as well as with a one click solution through your iOS device’s browser. Despite the ease of use, the more recent iterations of the iPhone have closed the security breach that allowed for websites like www.jailbreakme.com to work. For that reason, I’ll be using the evasi0n – iOS 6.0-6.1.2 Jailbreak to free an iPhone 4 16gb running OS 6.0.1 baseband 01.59.00*. The phone is carrier locked and the owner will be leaving for Europe shortly, and they need an internationally functioning phone.
Preparing to Jailbreak
There are a few requirements before you can begin unlocking an iOS device with the Evasion Jailbreak.
You need a suitable machine to perform the jailbreak with, supported operating systems include: Windows, Linux, and Mac OS.
iTunes needs to be installed on your computer of choice.
Your iOS device needs to be updated to at least iOS 6.0
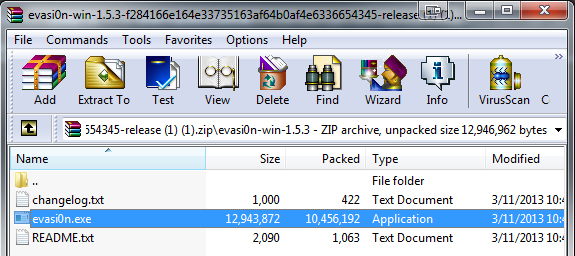
You need to have downloaded the Jailbreak executable, available here.
An extraction tool to get the files from the download, I suggest WinRAR by RARLAB.
You should back up any device before you jailbreak, should something go wrong.
Jailbreaking Process
The actual jailbreak process is extremely straightforward. Only a few steps are required to successfully jailbreak you iOS device using the evasi0n jailbreak.
Requirements
Ensure you meet all of the requirements listed above. Install iTunes, backup your iOS device (iPhone 4 in this case), and download the jailbreak tool.
Extract
Extract the executable file by dragging and dropping onto your desktop (or wherever is convenient) for later use.
Connect
Connect your iPhone or other Apple iOS device to your computer via usb/proprietary connector. Ensure your computer recognizes that your device is plugged in.
Run
From this point forward, we will not be touching iTunes or the iPhone until explicitly told to do so. Double click on the evasi0n icon that you’ve extracted and allow the program to run (if a dialog box appears). You will see the image above (less the bits about being jailbroken already), and if you read carefully – you’ll see that evasi0n is already scanning your phone’s software to see if it’s compatible. If everything is good, you can proceed with the one-click install of the jailbreak. Simply click on the button to the right and let the program do it’s thing.
In about five minutes you will be prompted to unlock and press a new icon on your apple device. After doing so, the device will power cycle several times. At this time, you can boot up Cydia App manager, which will again reboot your system. Cydia allows you to install third party applications on your Apple device, you are now free to download unapproved apps and tweaks not officially approved by Apple. This includes the tool we’ll be using to break our carrier sim-lock.
Carrier Sim Unlocking
UltraSn0w
Open Cydia and tap on the Search icon, and search for UltraSn0w – download and install this package. From here we will need to add an additional repository to our Cydia application. To do this we:
Open Cydia’s home page by closing and opening the app
Tap on the Manage icon found in the bottom bar
Tap on the Sources button in the middle of the screen
Tap on the Edit button found in the top right hand corner of your screen
Click on the Add button that appears in the top left of the screen
Type into the text box, “http://repo.iparelhos.com”
Tap the Add Source button
Once the operation completes, tap the Return to Cydia button found at the bottom of your screen (you may have to scroll)
Go back to your Cydia home screen and pull up the search function again by tapping the Search icon found in the bottom right corner of the screen. Search for Ultrasn0w Fixer for your OS version, and install this application. In my case, I’ll be using the Ultrasnow Fixer for 6.0.1.
So I know many people see the RSS feed logo on a daily basis and have no idea what it does, or why it exists. RSS stands for rich site summary, and does exactly what the name implies – provides a detailed summary of what is happening with a blog, news feed, or website in general. Most people use RSS because it can streamline a user’s daily news. Instead of visiting all of the blogs I enjoy to check for new content, or signing up for newsletters, I can have news and posts piped right into my RSS client. In this case I’ll be using Mozilla’s discontinued Thunderbird mail and feed client. I love the program as a free offline mail program, for it’s scheduling ability, and feed following, did I mention it was free? Get it here.
This is an RSS icon, you’ve undoubtedly seen it before.
Start by launching Mozilla Thunderbird
Press alt to bring up your menu bar
Navigate to File > New > Other Accounts…
Select ‘Blog & News Feeds”
Next
Name your feed, I choose names based on how it will help me sort the feeds
Next and finish
In your left bar you should now see your new account, click on it
Center top of your screen, click on “manage subscriptions”
Paste or type in your feed URL
Finish by clicking add
Browse your new feed by clicking on it’s name in the left panel
Double click a post title in the center window to open it in Mozilla Thunderbird
I was recently hired to create a slideshow for a customer’s display at trade shows. For me, the solution was simple… we kill the Batman. All joking aside, I knew exactly what I was going to do from the outset of this project.
The previous revision of this client’s presentation was a combination of circa 2008 hacks and flash. This combo together yielded a surprisingly well working slideshow with menus to select and sort shows. None of this content was dynamic in any way. With relatively short notice, there was no way I was to even salvage any part of the relic that was their past show.
The unfortunate thing about Supersized is it’s method of serving images. It’s engineered to be user friendly and be easy to use for even the most inexperienced code monkey. In the packages latest release, Sam has included some demos that can safely be used as starting points. This is exactly what I did, cutting what I can only imagine to be more than a week of work out of the project. This gives me more time to focus on the fine details and saves my customer money all the while – we both win.
When you download the supersized.x.x.x.zip file and open it up, you will see this:
Thank goodness for logical naming conventions, this folder is pretty self explanatory. Core holds the most stripped down version of the Supersized slider, while Flickr offers a slider that will pull content from a Flickr feed, and slideshow is the folder we’re after. As a side note: please take time to read and follow the directions as well as licence agreements included with any plugins or work that aren’t completely yours.
The Code – Default Behaviour
The first chunk of code we’re looking for can be found in demo.html
slides : [ // Slideshow Images
{image : 'http://buildinternet.s3.amazonaws.com/projects/supersized/3.2/slides/kazvan-1.jpg', title : 'Image Credit: Maria Kazvan', thumb : 'http://buildinternet.s3.amazonaws.com/projects/supersized/3.2/thumbs/kazvan-1.jpg', url : 'http://www.nonsensesociety.com/2011/04/maria-kazvan/'},
{image : 'http://buildinternet.s3.amazonaws.com/projects/supersized/3.2/slides/kazvan-2.jpg', title : 'Image Credit: Maria Kazvan', thumb : 'http://buildinternet.s3.amazonaws.com/projects/supersized/3.2/thumbs/kazvan-2.jpg', url : 'http://www.nonsensesociety.com/2011/04/maria-kazvan/'},
{image : 'http://buildinternet.s3.amazonaws.com/projects/supersized/3.2/slides/kazvan-3.jpg', title : 'Image Credit: Maria Kazvan', thumb : 'http://buildinternet.s3.amazonaws.com/projects/supersized/3.2/thumbs/kazvan-3.jpg', url : 'http://www.nonsensesociety.com/2011/04/maria-kazvan/'},
{image : 'http://buildinternet.s3.amazonaws.com/projects/supersized/3.2/slides/wojno-1.jpg', title : 'Image Credit: Colin Wojno', thumb : 'http://buildinternet.s3.amazonaws.com/projects/supersized/3.2/thumbs/wojno-1.jpg', url : 'http://www.nonsensesociety.com/2011/03/colin/'},
{image : 'http://buildinternet.s3.amazonaws.com/projects/supersized/3.2/slides/wojno-2.jpg', title : 'Image Credit: Colin Wojno', thumb : 'http://buildinternet.s3.amazonaws.com/projects/supersized/3.2/thumbs/wojno-2.jpg', url : 'http://www.nonsensesociety.com/2011/03/colin/'},
{image : 'http://buildinternet.s3.amazonaws.com/projects/supersized/3.2/slides/wojno-3.jpg', title : 'Image Credit: Colin Wojno', thumb : 'http://buildinternet.s3.amazonaws.com/projects/supersized/3.2/thumbs/wojno-3.jpg', url : 'http://www.nonsensesociety.com/2011/03/colin/'},
{image : 'http://buildinternet.s3.amazonaws.com/projects/supersized/3.2/slides/shaden-1.jpg', title : 'Image Credit: Brooke Shaden', thumb : 'http://buildinternet.s3.amazonaws.com/projects/supersized/3.2/thumbs/shaden-1.jpg', url : 'http://www.nonsensesociety.com/2011/06/brooke-shaden/'},
{image : 'http://buildinternet.s3.amazonaws.com/projects/supersized/3.2/slides/shaden-2.jpg', title : 'Image Credit: Brooke Shaden', thumb : 'http://buildinternet.s3.amazonaws.com/projects/supersized/3.2/thumbs/shaden-2.jpg', url : 'http://www.nonsensesociety.com/2011/06/brooke-shaden/'},
{image : 'http://buildinternet.s3.amazonaws.com/projects/supersized/3.2/slides/shaden-3.jpg', title : 'Image Credit: Brooke Shaden', thumb : 'http://buildinternet.s3.amazonaws.com/projects/supersized/3.2/thumbs/shaden-3.jpg', url : 'http://www.nonsensesociety.com/2011/06/brooke-shaden/'}
]
This is where the average user would manually enter all of the file names, locations and properties for each slide. We’re going to modify this chunk of code to scan a directory for images, and then output the images into this list. To do that we will have to use PHP. If you don’t have a server to test and develop on (I don’t blame anyone), you have no excuse to not be using XAMPP. XAMPP will emulate a server environment (sort of) on your own local machine, allowing you to work with PHP and databases. I choose to use XAMPP for this project for several reasons.
Connectivity at trade shows is an unknown factor.
Serving large high-resolution photos remotely is slow and gobbles bandwidth.
By keeping files totally local, there is little to no need to account for security in PHP used.
The Code – Dynamic Behavior
Our PHP will look like this, explanation as we continue.
slides :[]
Line 1 shows that we are opening a section of php code within our page – <?php to open, ?> to close.
Lines 2, and 3 we are establishing our variables. We set where we can find the images to be used in our slideshow, and where their thumbnail images are.
Line 4 runs a command that will scour our directory that we set, looking for all files (the asterisk *) with a ‘.jpg’ at the end. Whatever files are found, are then saved to an array as the variable $images. Line 5 runs the same command for the thumbs folder.
Line 6 is where the magic starts to happen, both arrays – one for whole images, the second for the thumbnails – are combined into one array. It’s important to note that the number of files in both folders (arrays) need to be identical, otherwise the arrays cannot be combined.
Line 7 begins a foreach loop that goes through the array and for every item, gets the combined contents in order and echos them as lines that mimic our starting JavaScript.
There you have it, dynamically loading content for your slideshow.
Polishing and Future Posts
One note to make is that the naming of each file will simply be the file name as it is on your server. You can correct this with PHP’s trim and str_replace.
slides  :
[]
These new lines must go inside of the for each loop so that the variable is refreshed with every pass of the array. Trim does exactly what it sounds like, trims what you give it. In this case it’s removing the directory path from the name of the file, and then the .jpg at the end of the name. Str_replace is capable of replacing a string of characters with another string (or nothing at all). In our case, I’m converting the underscores in file names to spaces. With these changes, the file “images/A_burning_page.jpg” will now be titled “A burning page.”
This article will be referenced in the near future when I get into explaining generating a full gallery/list of slideshows based on folders of images. Follow my RSS and comment for further help.